Friday, April 10, 2009

spring break??

I got two good days in the garage this week..

Its always amazing how much can be done in such a little amount of time.. WHEN you have all the pieces in one place.. (and when you have thought about what needs to be done for several days)

fortunately everything worked out well and had I not needed to eat, the woodie might be running now..


the punch list was 50 items long, some of the more noteworthy items..

finished the wiring (minus hooking up the horn, headlights and taillights)
finished the "proflo" wiring
finished plumbing the radiator, trans cooler, and completed the install of the rubber fuel hoses to the intake.
finished the air suspension (minus installing the PUMP for the final time)
finished the dashboard (minus the cluster wiring, which I cant finish until the cluster lens returns from the engraver)


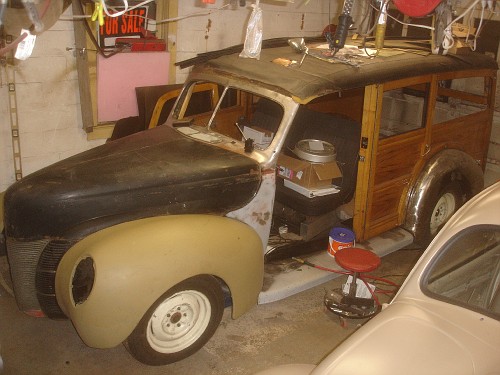
Here it is in super mockup. (with the need "old" hood i scored recently )

Monday, April 6, 2009

WINDOW WINDERS


what could possibly be so interesting about window winders???

well

this is what the stock 1940 ford (ONLY) woodie wagon window winder looks like (is winder a real word?)


see that fancy steel plate..

that plate holds the regulator to the door.. and serves as a method to trim off the inside of hte door.. these two pieces are relatively valuable.. due to their rarity.. each wagon needs 2. and these are only for 1940 ford..


that was a problem.. the above were offered to me for 200.00

I passed..

and I decided to search eBay

Where I found that WINDOW regulator's that looked VERY VERY SIMILAR..


so.. 50.00 later.. I had a pair.. that were.. NOS!

heres my install!


the latch "remotes" were salvaged from a pair of 37 ford doors I had bought..

RECYCLED!

Saturday, March 21, 2009

New.. IS UGLY


trying to keep all the parts "recycled" has been a challenge.. one place where I knew I would have difficulty was the turn signal switch..

Old Switches are available, but are often in need of serious repair..

So, my friends at Hudson Rod and Custom hooked me up with one of these switches

task 1 HIDE the wires..

I was (at first) going to attempt to mount the switch so that it would be hidden from view, but space under the dash is at a premium.. (and I don't have the gauges installed yet!)

additionally, the photo above is representative of how crummy these things look with the wires "exposed" (something I wanted to hide)

here are some tricks.. to the install


I started with a trip to a local hardware store for a pair of supply lines for my bathroom sink. these are chromed, and were on sale for about 3.00


after disassembling that turn signal switch I realized that i would need to make some minor modifications.. here I am holding the "chassis" of the switch.


here you can see the difference between a stock and a modified supply tube..


and here is the chassis and the tube reassembled..


a few minutes later.. I had the entire wiring harness of the switch run through the tube, and the switch reassembled.. I'll connect up the harness to the switch wires this week..

and lights will flash!


additionally, you'll notice that I have a "unique" mount for my switches.. all in the name of a compact design.